Draw a weapon with just 6 basic errands! Chains come in various assortments to suit different purposes. Despite what kind of gun we are making due, they are, for each situation, genuinely strong. These guns have many little parts and nuances, and sorting out some way to make a weapon can be unstable. Since it doesn’t make it inconvenient, you can do it a lot less complex when you have at any rate some thought of what to do.
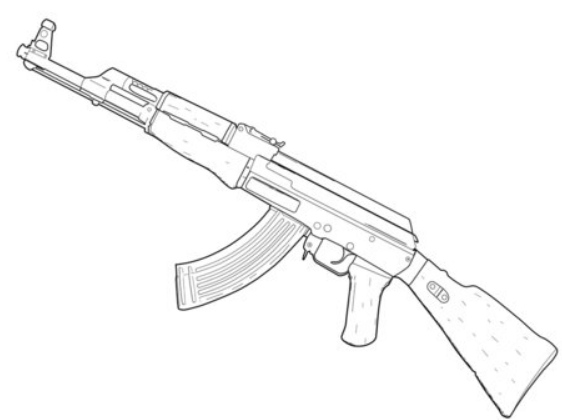
Luckily, this is an assistant assuming you accept you ought to do exactly that! Our little-by-little aid on the most capable technique to draw in a weapon’s 6 phases will let you know the most ideal way to make one of these shocking guns. the best technique to draw in a gun 6 phases pencil sketch drawing
Table of Contents
Guidelines to Take out A Gun – We ought to Get everything going! 1 phase
gun drawing stage 1 We will draw the trigger guard and the independent grasp to begin this guide on the most capable strategy to take out a firearm. For this underlying step, you can insinuate that took a gander at the picture without a very remarkable stretch and repeated the shape as it appears there.
Using several twisted lines, we will draw the graph of the back of the tent with its base and front. Then, at that point, the trigger guardian line will be drawn with another twisted and round line.Then, at that point, draw the real trigger by drawing a feeble, twisted shape inside the condition of the trigger guardian.
Stage 2 – Then start drawing in additional weapons. This step
fire a grade 2″ weapon During the second piece of your gun drawing, we will add more detail to the weapon drawing. To begin with, use a straight line over the piece of the lines you have proactively drawn.Then, use a more restricted straight line at the earliest reference point of the line to complete that piece of the weapon.
With this piece of the framework all out, we’ll draw a vertical rectangular shape inside the solitary hold. From here, you can draw a round shape with a straight edge pulled up for weapon security. At last, you can complete the watch components as shown in the image report.
Stage 3 – Draw in additional outlines. This step
fire a grade-3 weapon We will continue adding pictures drawing in and depicting this step of our guide on the most effective way to pull a gun. To do this, we’ll draw the top, or barrel, of the weapon. We will use it to some degree longer. Straighter twisted lines to do this.
Here you should carefully copy the reference picture as several sections are standing apart of the weapon. You can moreover pull the gun hammer on its back, drawing a round shape with a little circle on it. At the point when you’re satisfied with what it resembles, we’ll be ready for stage 4!
Stage 4 – By and by, fairly more about the weapon
fire a grade-4 weapon The accompanying stages will be established on your falsely glamorized appreciation to add more detail to your image and make it look more reasonable. The vast majority of the lines we’ll remember for this fourth step will be extraordinarily straight, so you’ll find utilizing a ruler to draw most of them less complex. A more unassuming piece of the lines will be twisted and changed.
It is ideal to focus on all of these nuances as they show up in the model picture, and a short time later, we can go on toward specific finals in the accompanying part.
Stage 5 – Access the Last Nuances of Your Gun Drawing
releasing a grade 5″ firearm Before adding tone to your image, we triumph ultimately over a few last contacts and nuances to remember for this fifth step of the guide on the most capable strategy to pull a gun.
We’ll start adding heaps of straight lines near each other, near the uttermost furthest reaches of the weapon barrel. Then, you can add a couple of little circles to a piece of the weapon locales, safeguarding them with maintenance. You’ll be ready for the last step when these elements are added! Similarly, you could add a couple of remarkable nuances to make it incredible.
One idea is to pull a gun hand or draw in a manual to show where that weapon is used. Would it be that you accept what you ought to do with this image?
Stage 6 – Finish your weapon drawing with an Assortment
fire a grade 6 weapon Tech guns aren’t exactly known for their splendid assortments, so we utilized extra viable and changed varieties to tear this gun. We included faint for the firearm handles and a short time later found dif.