

Learn more about the Snap Pixel and starting tracking conversions in four steps!
The Snap Pixel is a tool that helps advertisers measure, optimize, and build audiences for their ad campaigns. In today’s digital world where the average household has 11 connected devices1, the path to purchase is anything but linear. Having real-time insight into what actions your customers are taking along this path is key, which is why implementing the Snap Pixel is critical for Snapchat advertising success.
What is the Snap Pixel?
The Snap Pixel is a piece of JavaScript code placed on your website that allows you to track the actions that Snapchat take on your website. For example, when a Snapchat adds a product to their cart, this triggers a Snap Pixel event that is reported within your ad account. This allows you to attribute conversion events, like an add to cart event, to your campaigns, and re-engage Snapchat who have visited or completed a similar action on your site.
Having a Snap Pixel set up allows you to track customer events across devices; so when a user sees your ad on Snapchat Public Profile, and later makes a purchase on desktop, the Snap Pixel tracks that event and allows you to attribute your ad to their actions. As the Snap Pixel measures more conversion events, Snapchat learns more about the types of people who are most likely to take similar actions, allowing you to unlock conversion optimization for your campaigns.
The Benefits of Using the Snap Pixel
With the Snap Pixel in place, you can implement highly-targeted campaigns, analyze the actions Snapchatters take, build custom audiences, and optimize based on real-time insights.
The Snap Pixel measures a range of actions that directly tie back to business goals like driving product views, leads, subscriptions, or purchases. And because the measurement takes place across multiple devices and site visits, you’re able to understand the actions Snapchat take on their path to conversion.
Key benefits of installing the Snap Pixel include:
- Measuring conversion events that matter: See all the actions that take place on your site, across all devices, and attribute conversions back to your ad campaigns to understand the true impact.
- Reaching the perfect audience: Create Pixel Custom Audiences and Lookalike Audiences based on Snapchat who have visited your website and the specific actions they took.
- Optimizing campaigns to reach people most likely to take action: Use real-time insights to optimize delivery of your campaigns for results that matter most to your business.
How to Install the Snap Pixel
There are a few ways to deploy the Snap Pixel on your website, but the most common method is to manually place the Snap Pixel in your website code on all pages. However, if you are using one of the common platforms or tag management solutions below, we also offer custom integrations that make it even easier:
While the setup might vary slightly when using an integration, there are four key steps to installing Snap Pixel:
- Create
- Set up
- Validate
- Analyze
Step 1: Create a Snapchat Pixel
Generate your Snapchat Pixel code within Ads Manager
- Log in to your Ads Manager account.
- Click the menu in the top left corner and select ‘Events Manager’.
- Select ‘New Event Source’ and click ‘Create Snap Pixel’ in the middle of the screen. You will be prompted with a pop up that provides all the necessary details and instructions on setting up your Snap Pixel that looks like this:
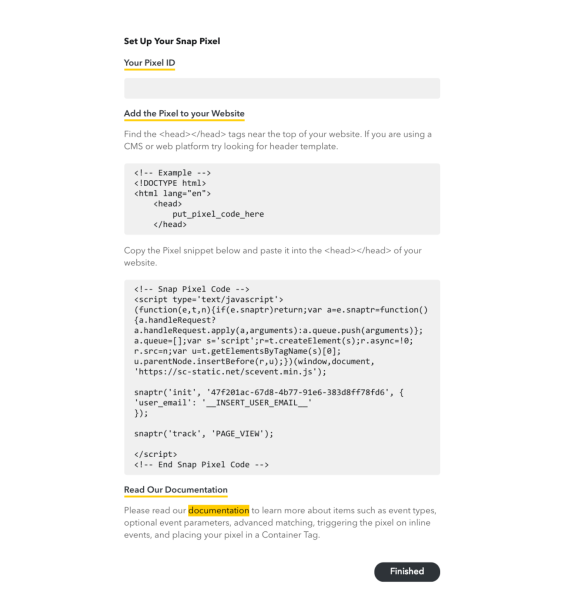
Step 2: Set Up a Snap Pixel
Implement the Snap Pixel on your website
- In Ads Manager, click the menu in the top corner and select ‘Events Manager’.
- Click ‘View Pixel Details’ to be brought into the details of your newly created pixel
- Click ‘Setup Pixel’ in the top right hand corner
- Select Pixel Code from the pop up and copy the provided JavaScript code.
- Within your website’s code base, find the header template, and copy and paste the code
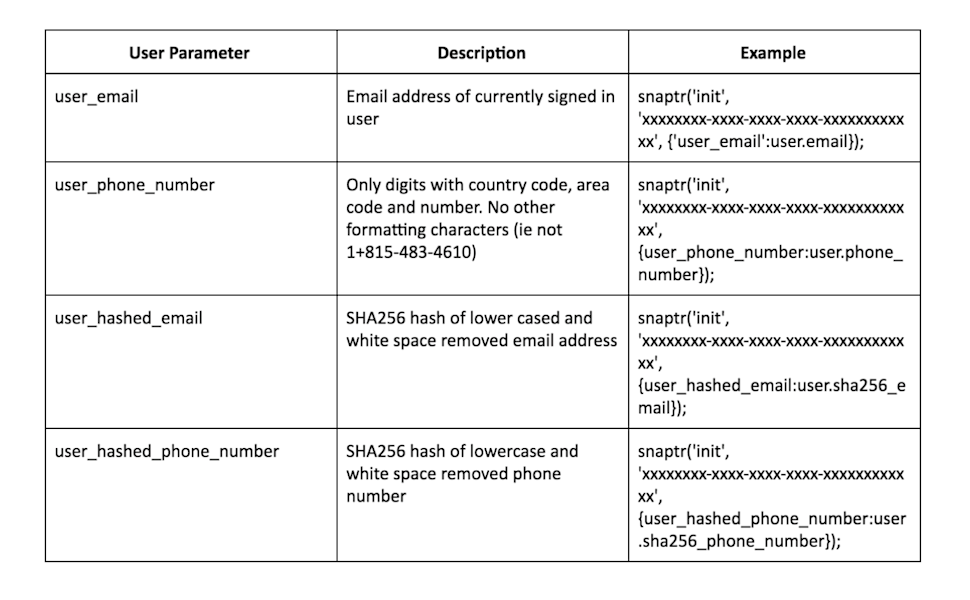
- Pass a user parameter:
– In order for Snapchat to potentially match your browser, it’s highly encouraged to pass a user parameter (email or phone number). We recommend passing at least one user parameter to assist with matching conversion events back to your ad campaigns.
– To do this, find where it says “snaptr(‘init’, ‘xxxxxxxx-xxxx-xxxx-xxxx-xxxxxxxxxxxx’, {user_email’:’_INSERT_USER_EMAIL_’});” in the pixel code and change it to the user parameter of your choice using the chart below.
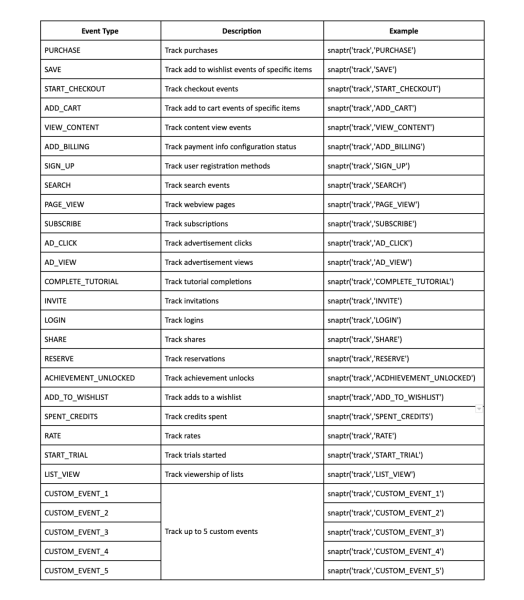
5. Update the code to capture the website activity you care about:
– We have standard pixel events, such as page views, purchases, add to cart and sign up. We also have five optional custom events that you can use to customize what you track. You will need to update the code to the event you want to track.
– To do this, find where it says “snaptr(‘track’,’PAGE VIEW’);” in the pixel code and update the event using the charts below. Please note: for each of these events, there are additional parameters that we recommend you fill in, with dynamic values. For example, for the purchase event you can fill in optional events such as currency, price, item category, item ID, number of items and transaction ID.

Step 3: Validate a Snap Pixel
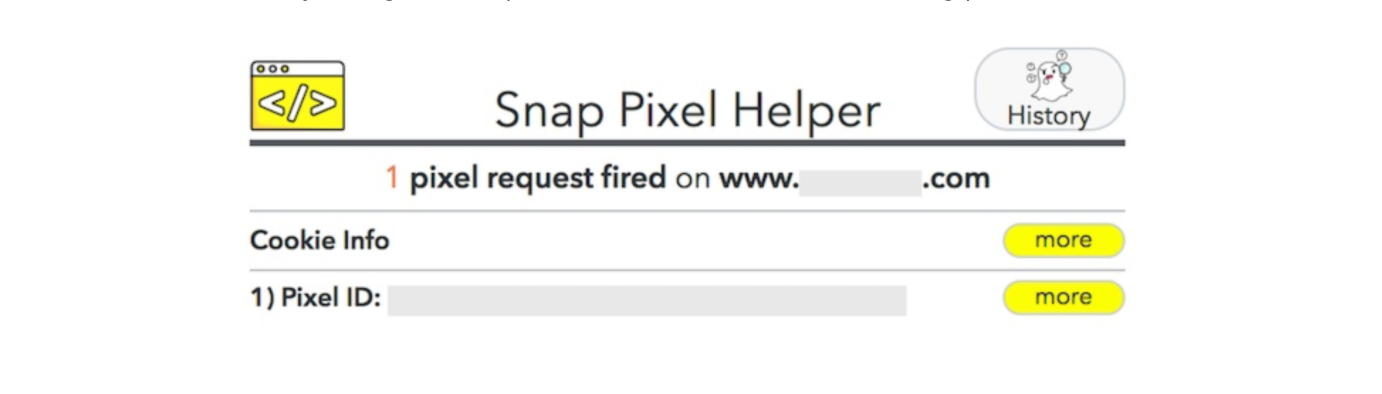
Use the Snap Pixel Helper to verify and troubleshoot Snap Pixel implementations
- Download the Snap Pixel Helper Chrome Extension or go to chrome://extension and search for ‘Snap Pixel’.
- Click ‘Add to Chrome’.
- When added, you’ll notice a small Snapchat ghost on the top right hand corner of your menu bar. To use this extension, click on this icon.
- If you navigate to your website where the Snap Pixel is placed, you should see the red notification in the chrome extension. This means that we have detected the Snap Pixel. Click on the extension in your Chrome bar to see if the pixel is recording events correctly with all specified parameters. Learn more about the Snap Pixel Helper here.
For step-by-step instructions on how to validate a Snap Pixel, watch this video (in English). You may also use the diagnostic section of Events Manager to understand if the pixel is set up and parameters are being sent back correctly.
Step 4: Attach Snap Pixel to Campaigns & Analyze Data
Enable Pixel tracking in Ads Manager
- In Ads Manager, click the menu in the top left corner and select ‘Manage Ads’.
- Select the Ad Set you would like to track conversions for.
- Select ‘Edit’ and toggle the Snap Pixel option to ‘Attached’.
Analyze the results of your campaigns
- In Ads Manager, click the menu in the top corner and select ‘Snap Pixel’. Here, you can see your aggregate statistics and detailed dashboards for your pixel data.
- You can also see attributed conversions by navigating to ‘Manage Ads’ from the top left corner. From there, you can adjust the columns in the table to see metrics like purchases, purchase value, and return on ad spend. Just select the metrics you want to see, press save, and analyze the data in the reporting.
- Export the data as a .csv to analyze further.


